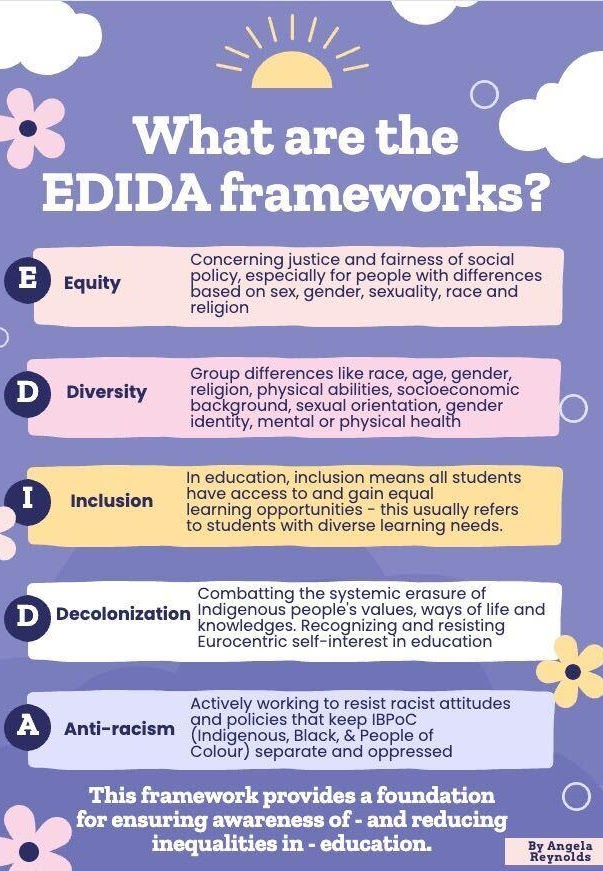
EDIDA framework fosters all students within our classrooms. The framework outlines the need to use culturally responsive teaching practices to ensure our classroom includes Equity, Diversity, Inclusion, Decolonization and Anti-racism practices. Our students come from a variety of backgrounds and each has a unique learning style. Coming from an Educational Assistant background, I chose to create a project that focused on Equity and Inclusion, although I found myself thinking about all aspects of the EDIDA framework highlighted with my final project.
Students homes are not always the safest environments and as an educator, ideally I would like to be the second safest place for my students. Unfortunately, in some cases, my classroom may be the safest place for my students. I want my students to know that I am a safe place for them, and that it is okay to feel a variety of feelings or emotions. Through the introduction of my project to the classroom and the use of it on a daily basis, students will learn that identifying their feelings may be enough to make them feel better. If they require more of a check-in, students will grow to understand that I will listen to their feelings and will help guide them to ways of navigating and understanding what these feelings mean.
Inspiration for my Project
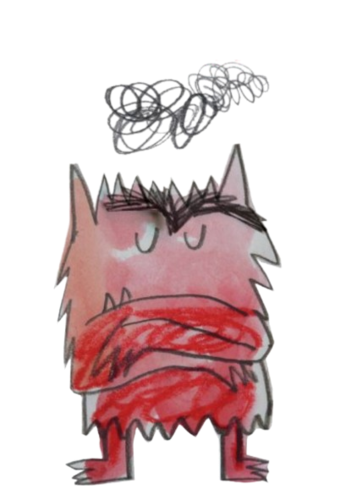
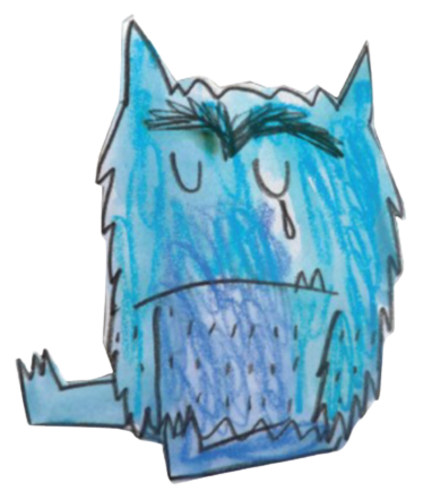
The Color Monster by Anna Llenas is the inspiration for my project. The “Color Monster” wakes up feeling confused and his emotions are all mixed up. A young girl helps the “Color Monster” to sort out his emotions and identify the different emotions he may be feeling. From the book, I decided that I would create a wooden box where each morning students could identify their feelings with coloured discs and drop them into the box. Students wouldn’t have to share the colour disc they chose with any other students. This would be a daily opportunity for students to identify how they are feeling and if needed we could use the box throughout the day; First thing, after recess, after lunch; if it seemed to be helping students identify their feelings. Sometimes putting a label on our feelings is all that is needed to feel better. Sometimes a deeper conversation is needed and students would be aware that they could always come talk to me if they needed a deeper conversation with regards to their feelings and emotions.

Process of my Project Creation
I wanted to create a project that created a class community and something that all students were part of. I started by thinking of a class jigsaw puzzle for the classroom wall. My idea was that all students would colour a puzzle piece and together would create a piece of art for the wall. As I thought about this idea more, it felt a little like a “one and done” project and I wanted to create a project that was more meaningful for myself and for my class.
I thought about creating a paper box on my Cricut where students could create small puzzle pieces and put them in the paper box. Here we are unique on our own, but together create a beautiful keepsake for me of our class community. Thoughtful idea, but not very practical if I was to do this with every class, every year. Imagine the storage I would need to keep all these boxes!
That’s when the idea to create a wooden box with coloured tokens began to take shape…
Step 1:
I started by sketching what I imagined the box would look like. I started by drawing it out on paper in a loose sketch.

From there I created a more realistic image, although my drawing skills are not something to write home about!

Step 2:
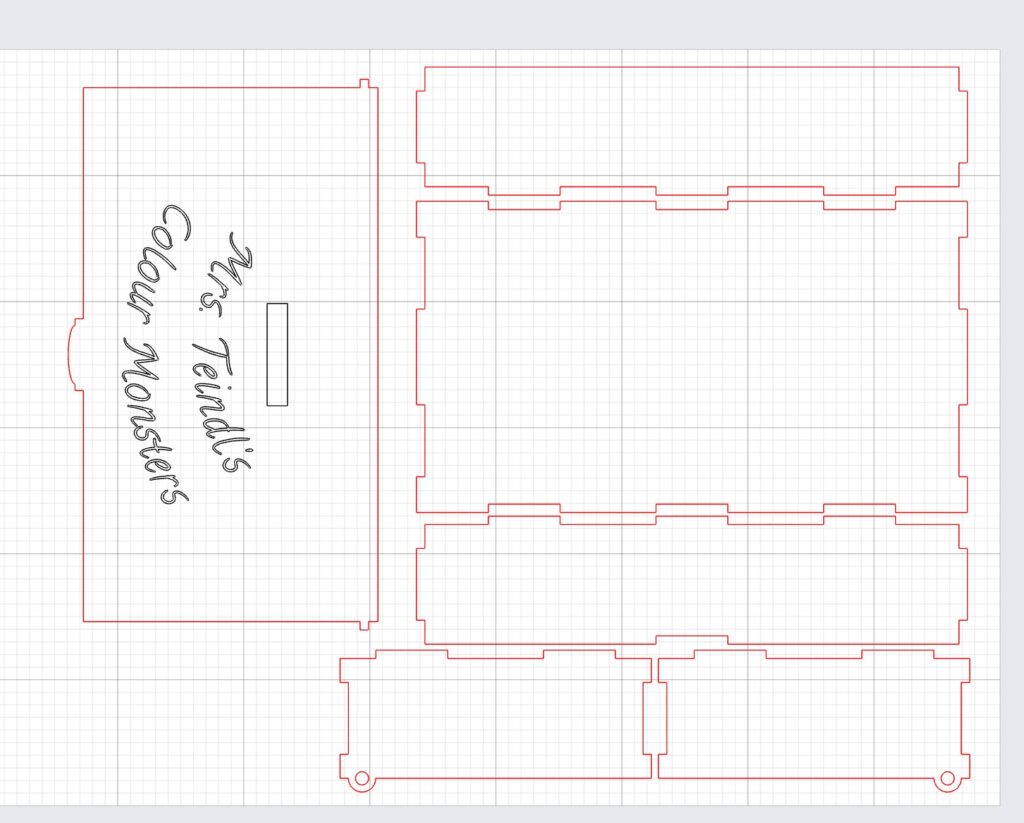
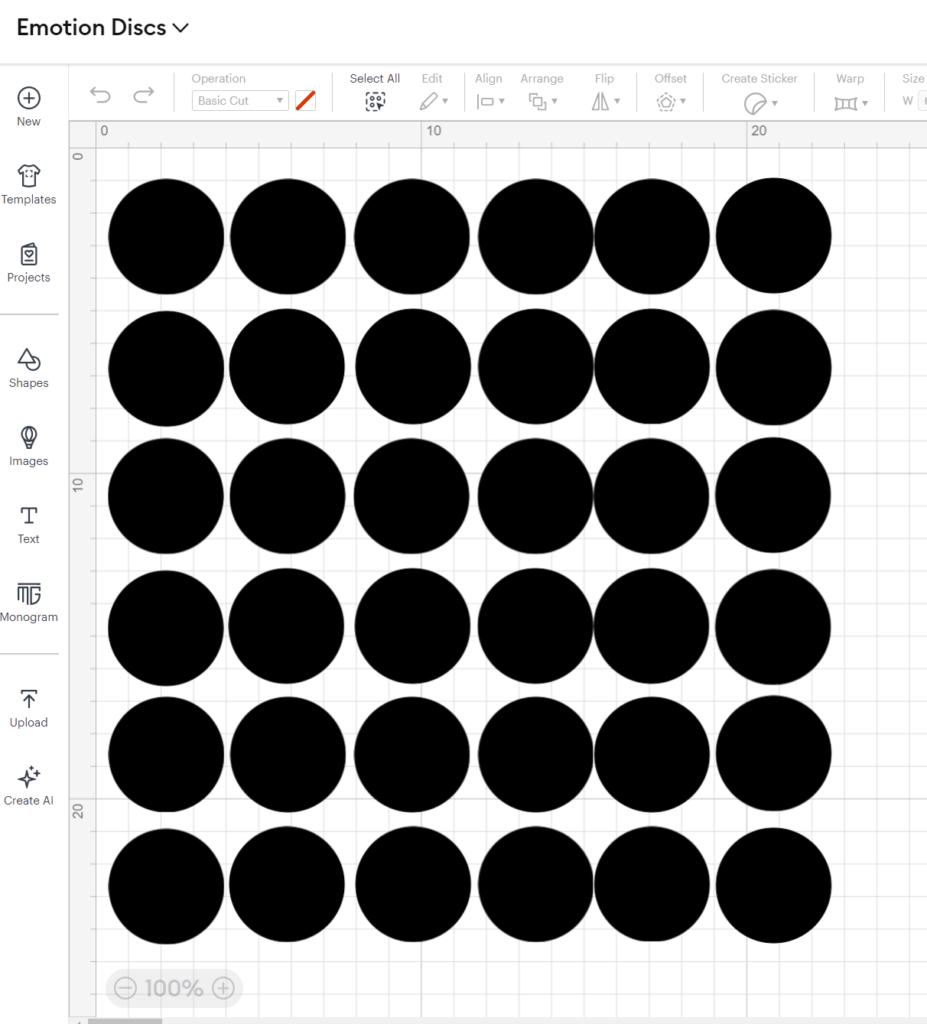
I created my template using Cricut design space. I ordered ‘Base Wood Sheets’ off of Amazon and some deep point cutting blades for my Cricut machine. I wanted to create a project that I could, if necessary, have the means within my grasp to adjust or make changes to. The wooden sheets that I purchased were a lot smaller than my template so I ended up have to alter my template to fit the wood pieces I had.
Step 3:
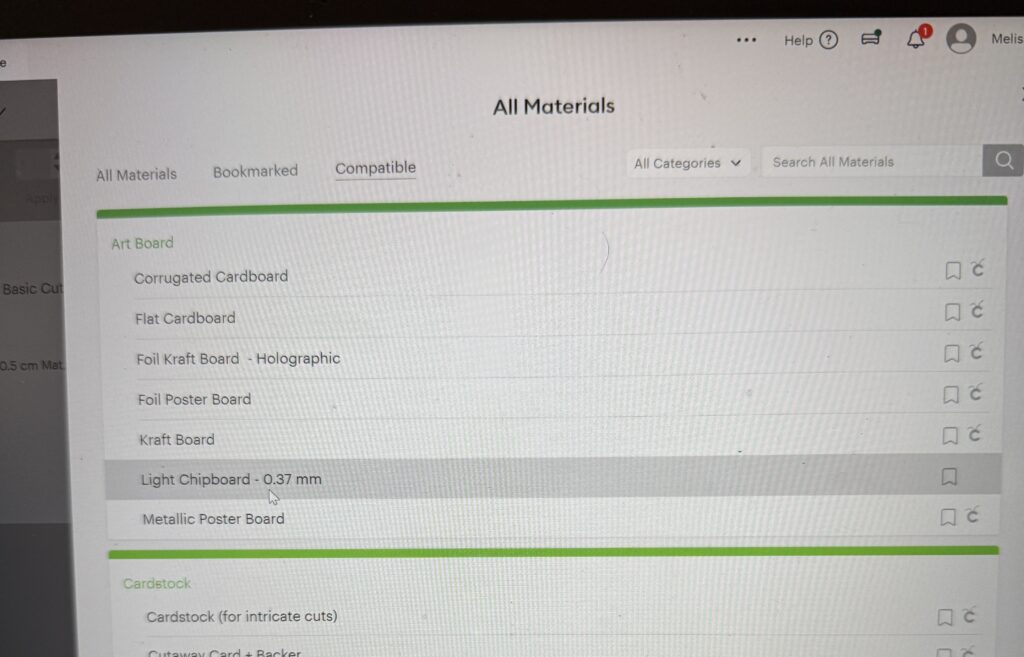
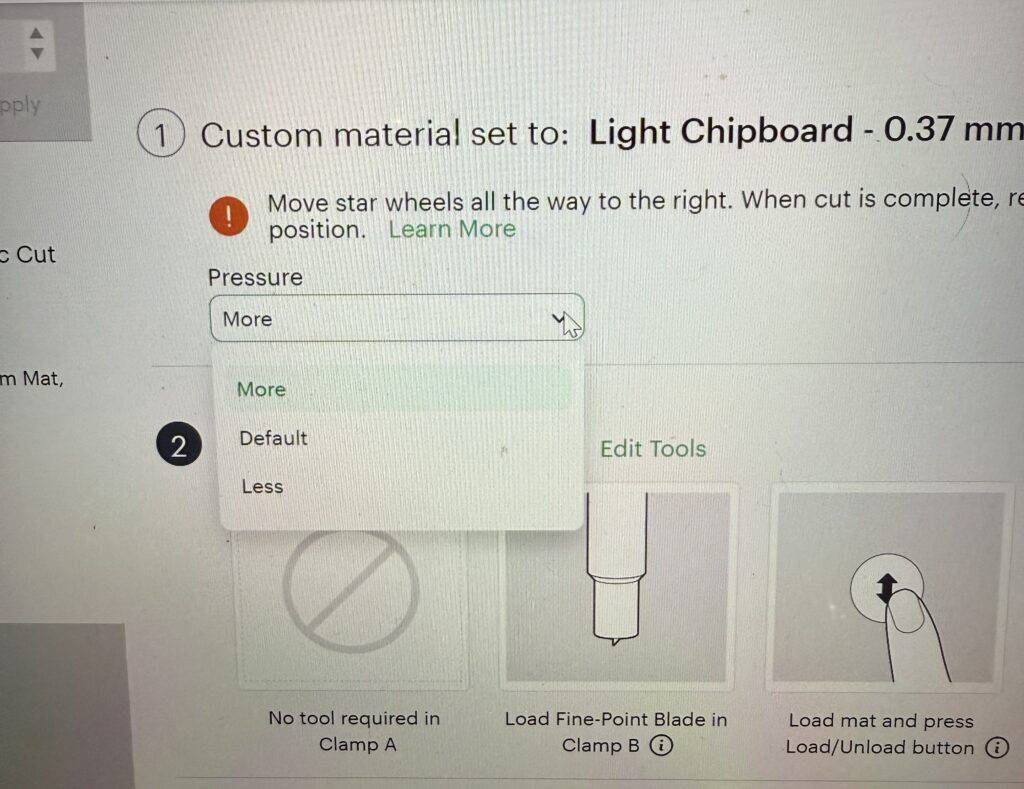
The process of setting up my Cricut to cut more than vinyl was relatively easy. I changed the blade, selected the material that I was planning to cut, as well as selected the pressure I wanted for cutting. Unfortunately, the wood was very cheap and the blade did not cut all the way through the wood, which made the wood split and look messy.
Step 4:
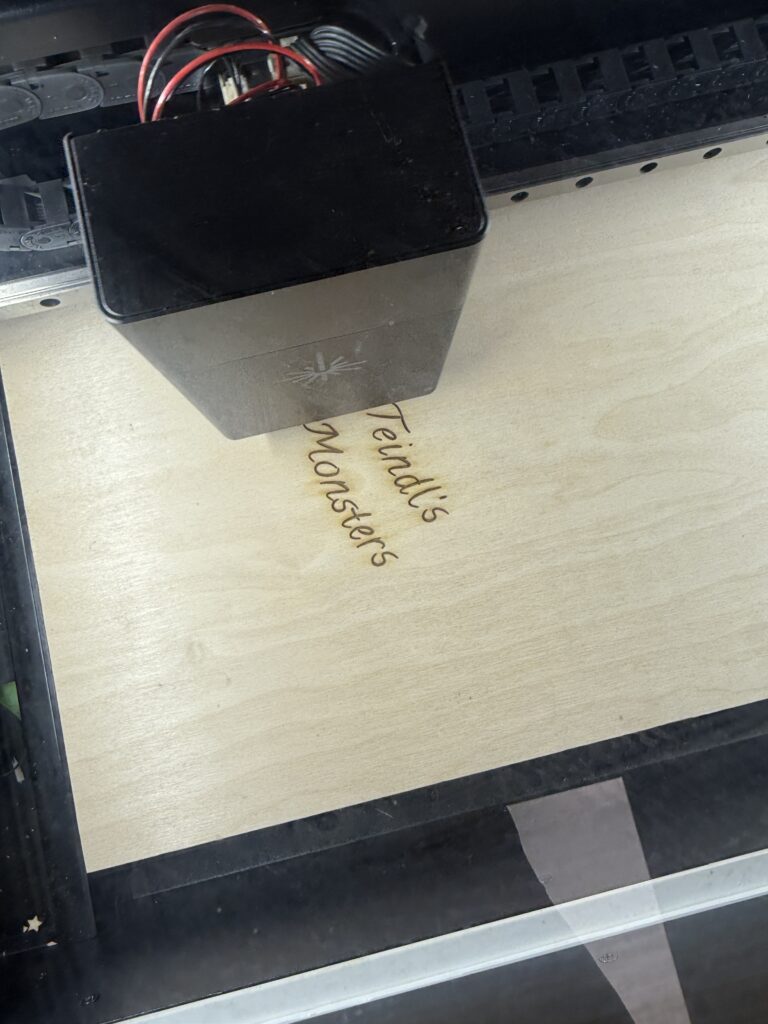
After deciding that the Cricut wasn’t going to work for my project, I decided to create a template on the X-Tools App for the Laser Cutter in the design lab. It was pretty easy to download the free app onto my computer and begin my design process. Originally I was going to add stickers to my design, but decided that I would engrave on the lid instead.
Step 5:
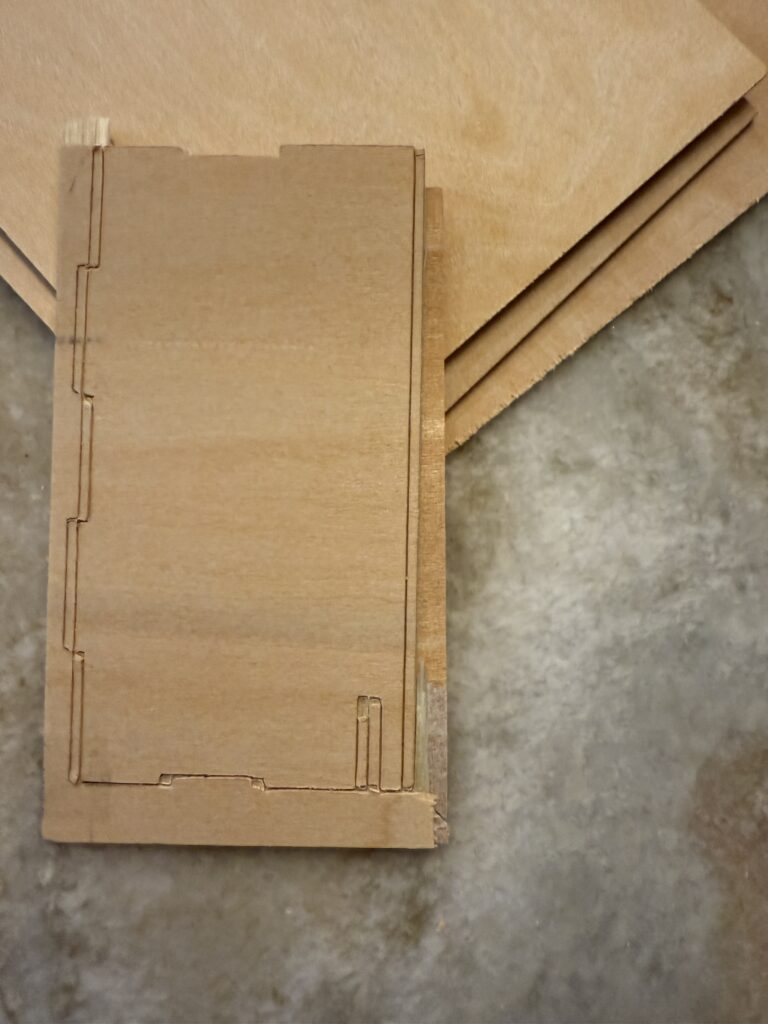
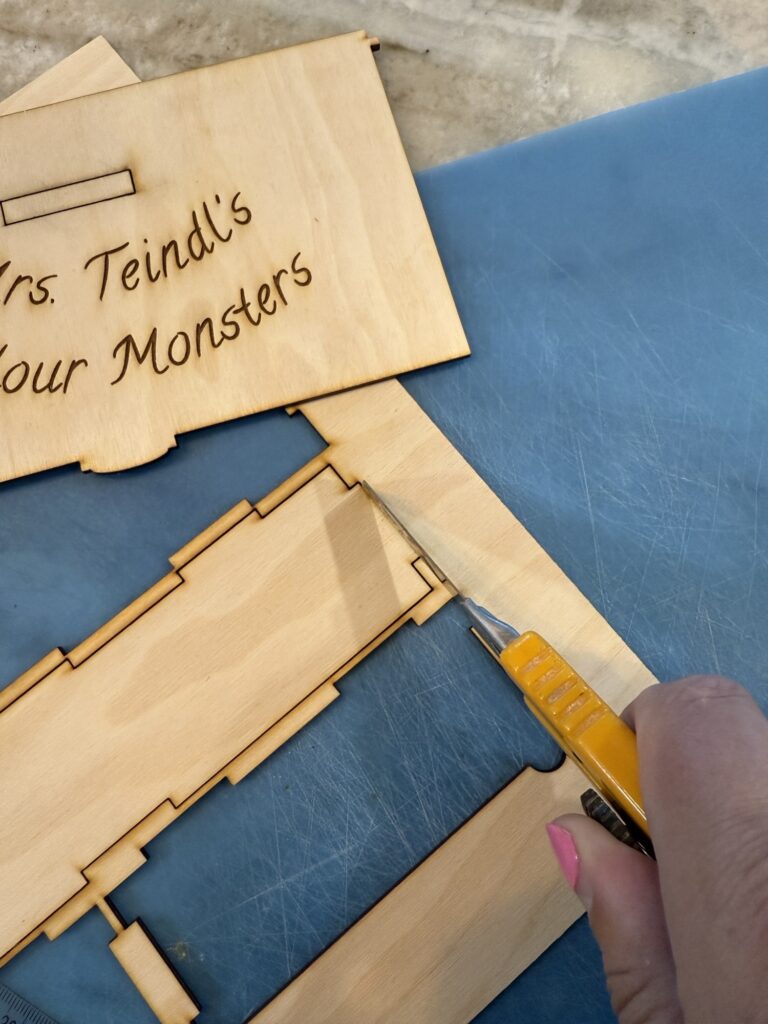
I cut out my box in the design lab using the laser cutter. Most of the pieces dropped but a few of the cuts didn’t go all the way through. In order to get them to cut through, I used an Exacto knife and ruler to cut through the wood. I was worried about the small rectangle in the lid, as I didn’t want to ruin my lid. With time and patience, I finally was able to have all my pieces.

Step 6:
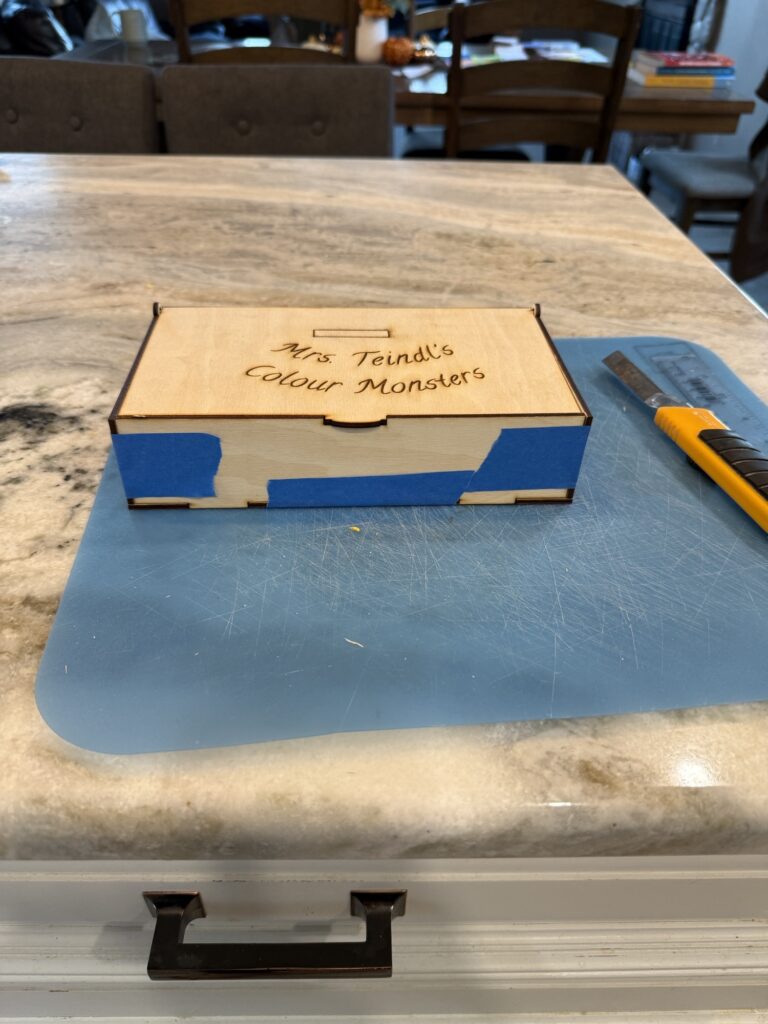
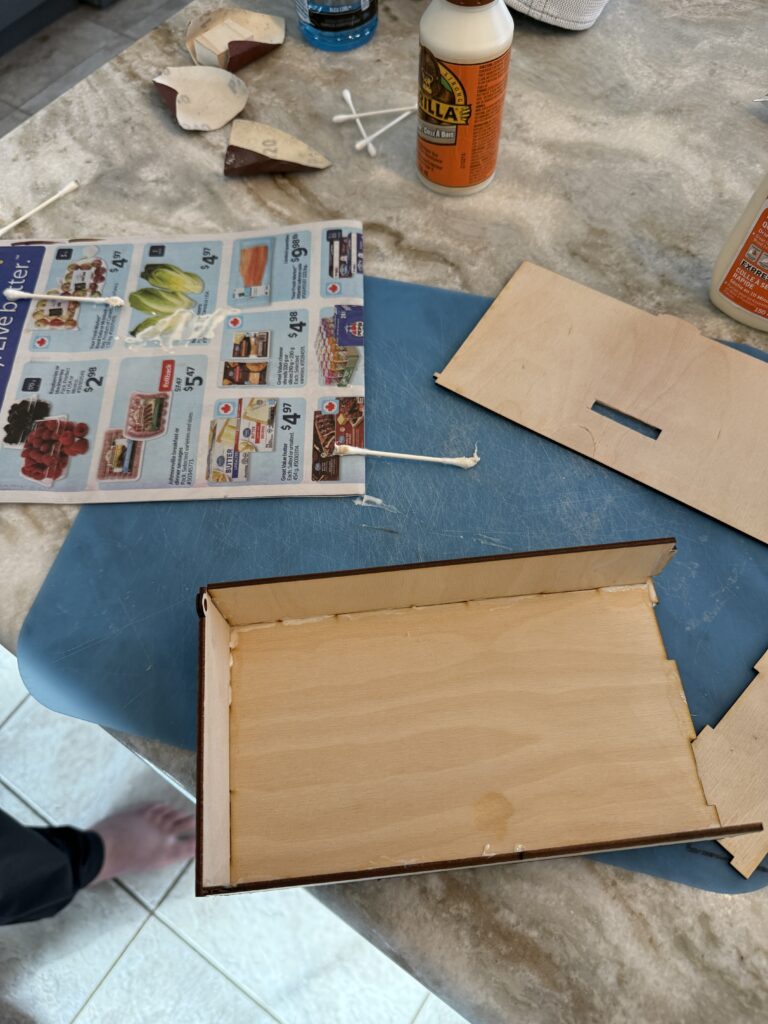
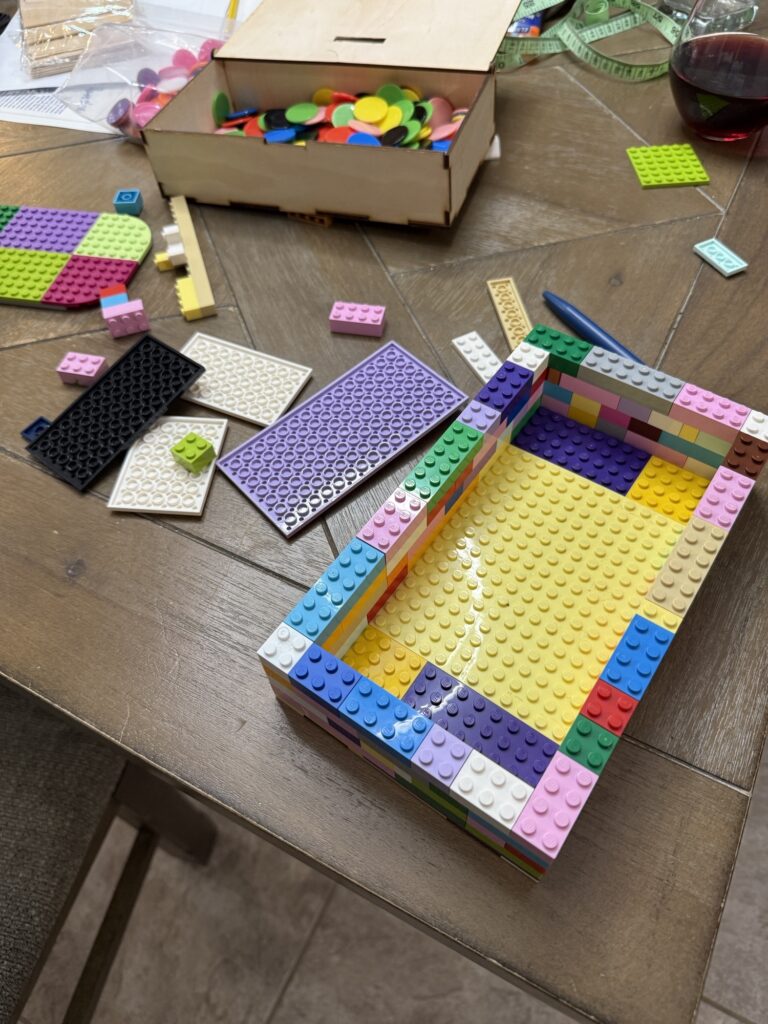
I taped my box together to give me an idea of how all the pieces fit together. I liked how everything looked so I decided to start gluing my box together with wood glue. I started by using Q-tips to apply the glue to all the pieces then slowly started to form my box. The glue was quick drying and my box was fully held together in less than an hour.
Step 7:
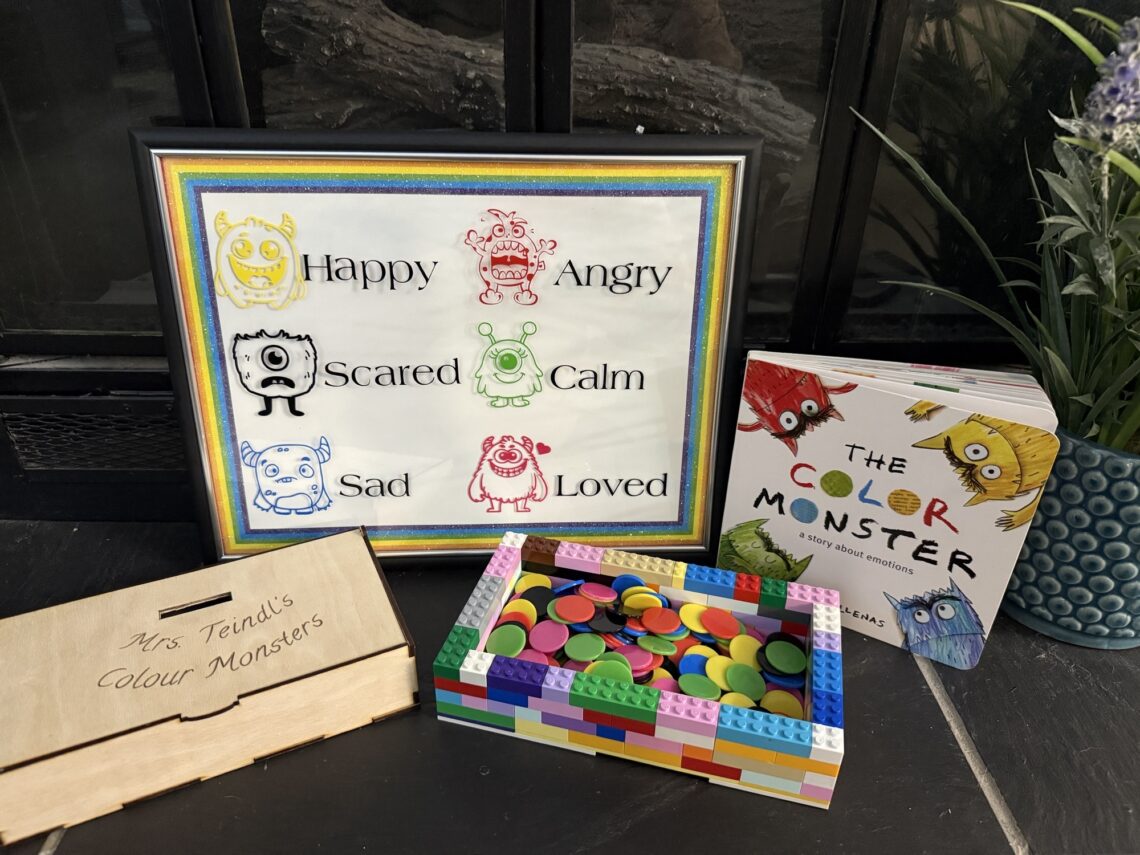
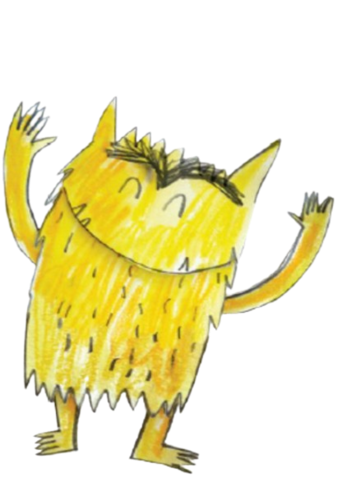
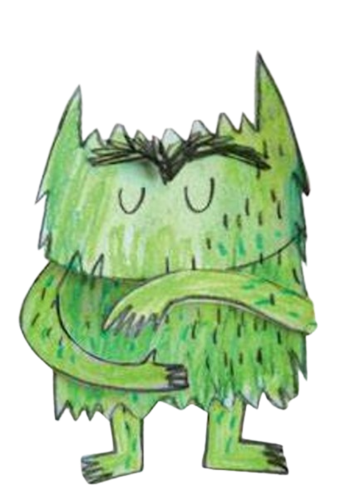
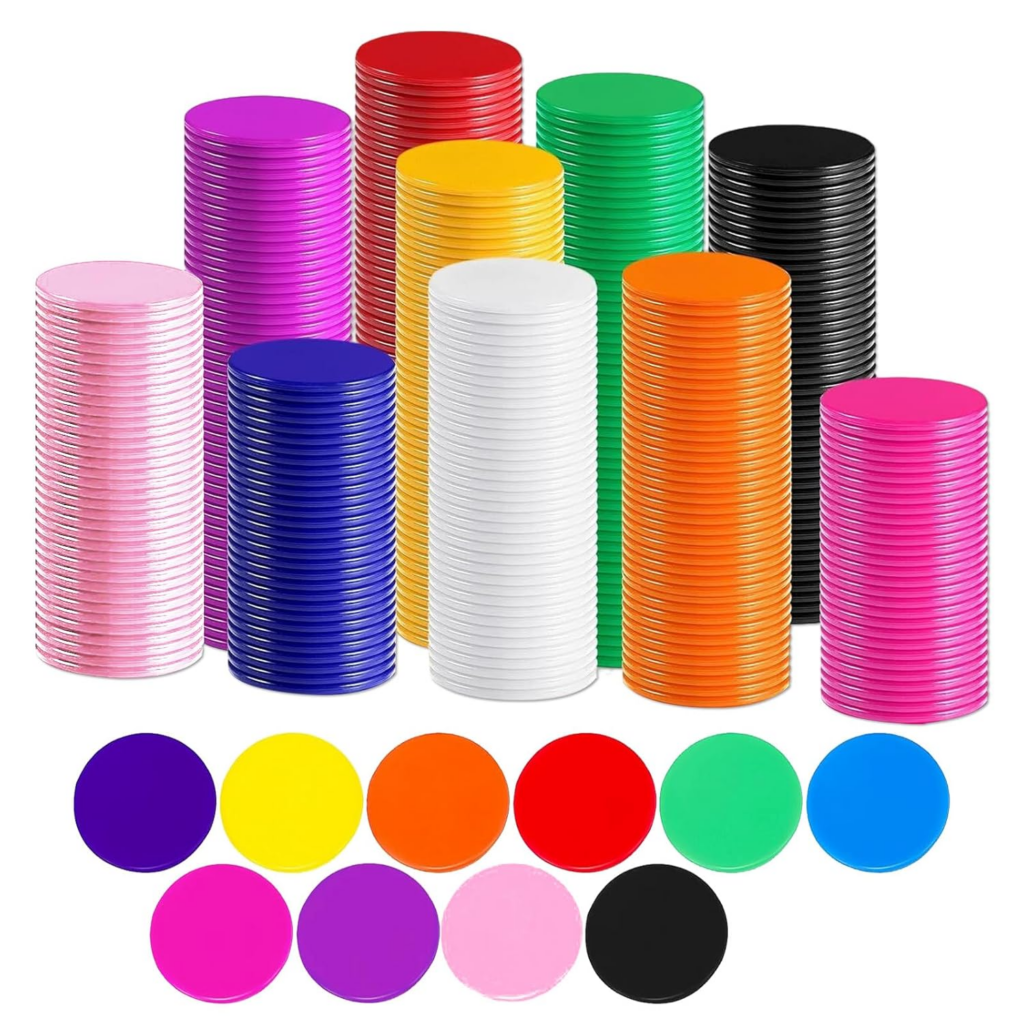
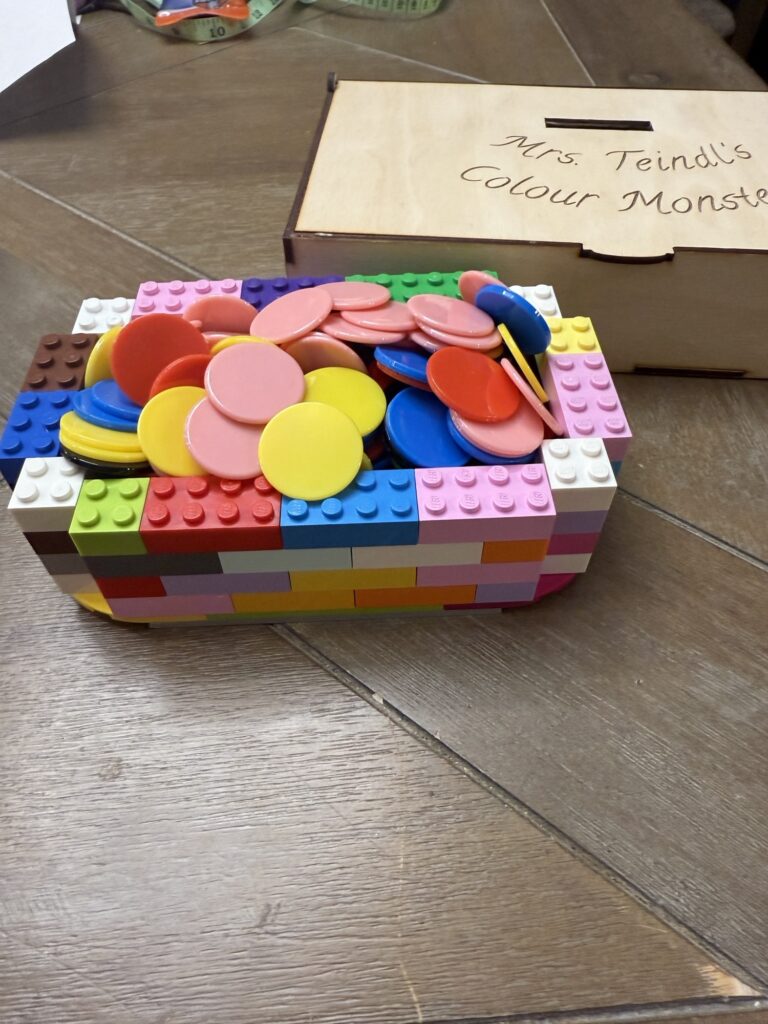
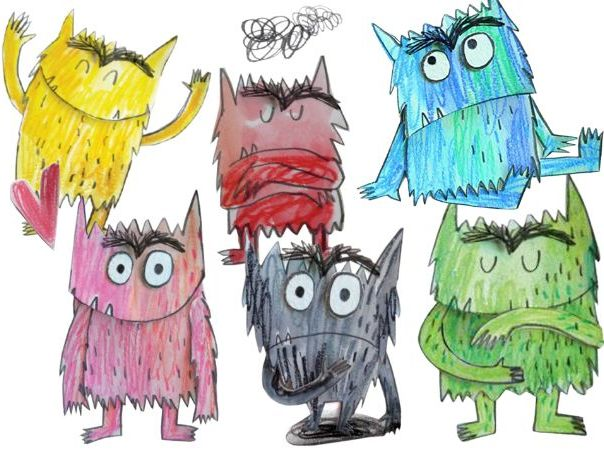
So now my project was a wooden box and a book that was my inspiration, but what was I going to use for tokens? I thought about painting wood sheets and cutting them out on the laser printer. I created a template, but with various amounts of students in the classroom each year, I would need about 30 tokens of each colour of the “color monsters” feelings in order to give the students all the opportunity to choose a colour that fit their emotions or feelings. In the book, the “Color Monster” feels Yellow for Happiness, Blue for Sadness, Black for Scared, Red for Anger, Green for Calm, and Pink for Loved. 30 tokens of 6 colours would result in 180 tokens needed. Since I wasn’t able to cut wood using my Cricut, I wasn’t sure that I wanted to use that much material from the design lab.
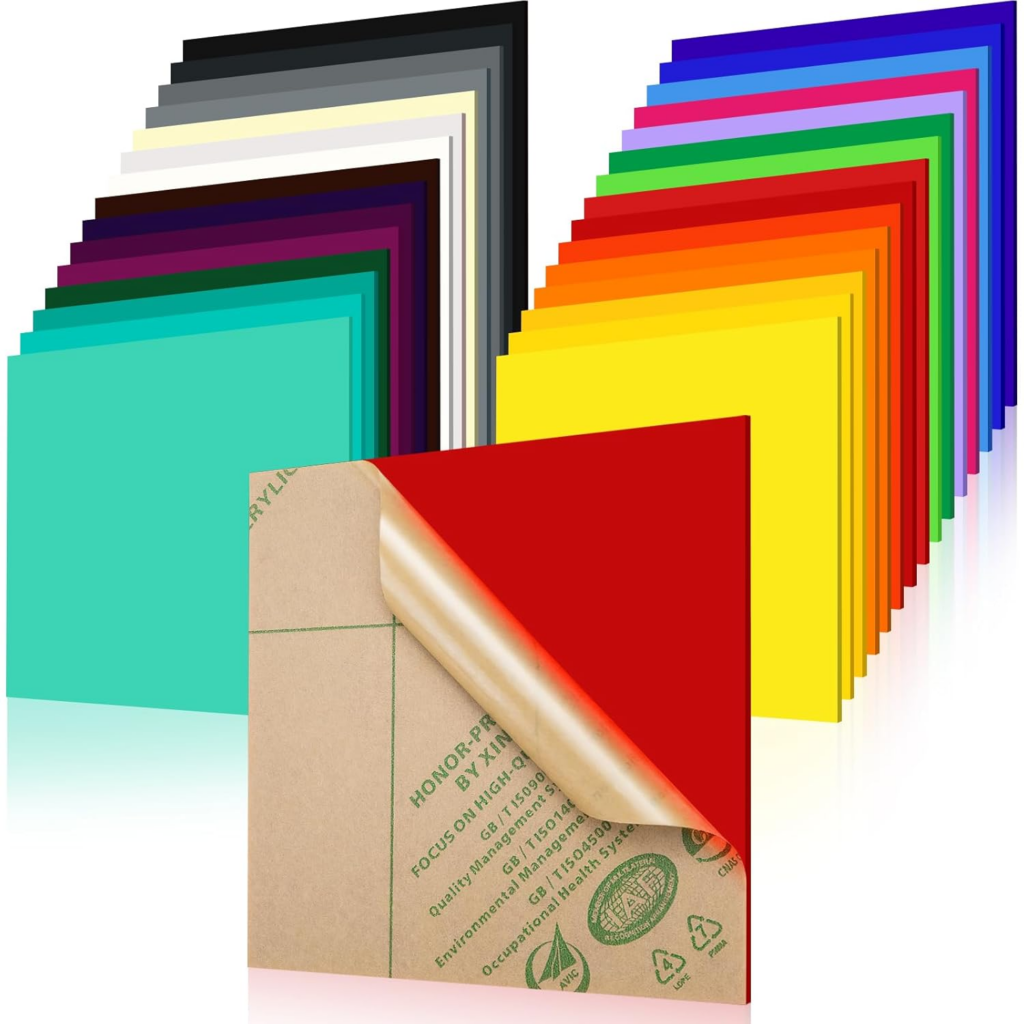
I thought about trying to cut the tokens out on my Cricut on coloured acrylic plastic, but in order to get all the right colours it would cost over $50.00 for the material and I wasn’t sure how well the product would cut or if I would be left with sharp edges that would be potentially dangerous to my future students. In the end, I found multiple coloured pre-made coloured chips for around $20.00. I decided to purchase these as there will be many uses for these chips throughout my practicum and startup as a teacher and I felt that the edges wouldn’t be as sharp as if I were to cut them out myself.

Step 8:

Okay, so I have the book, tokens, and the box, but what was I going to store the tokens in? I decided that I needed another box. I thought about potentially creating a second wooden box to store my tokens in but thought this could get confusing for students. My daughter was downstairs playing Lego as I pondered my dilemma, when I heard the noise no parent wants to hear: the dropping of the Lego bin on the playroom floor; Lego scattering everywhere. I was trying to come up with an idea for my project, when the noise created a light bulb moment! I yelled down for her to bring up a bin of Lego (She has many!). To her delight of not being in trouble for spilling the Lego, and my sudden interest in playing Lego, she brought up a large bin full of multi-colored Lego. Ahhhh…..the “Color Monsters” token box just needed to be assembled.
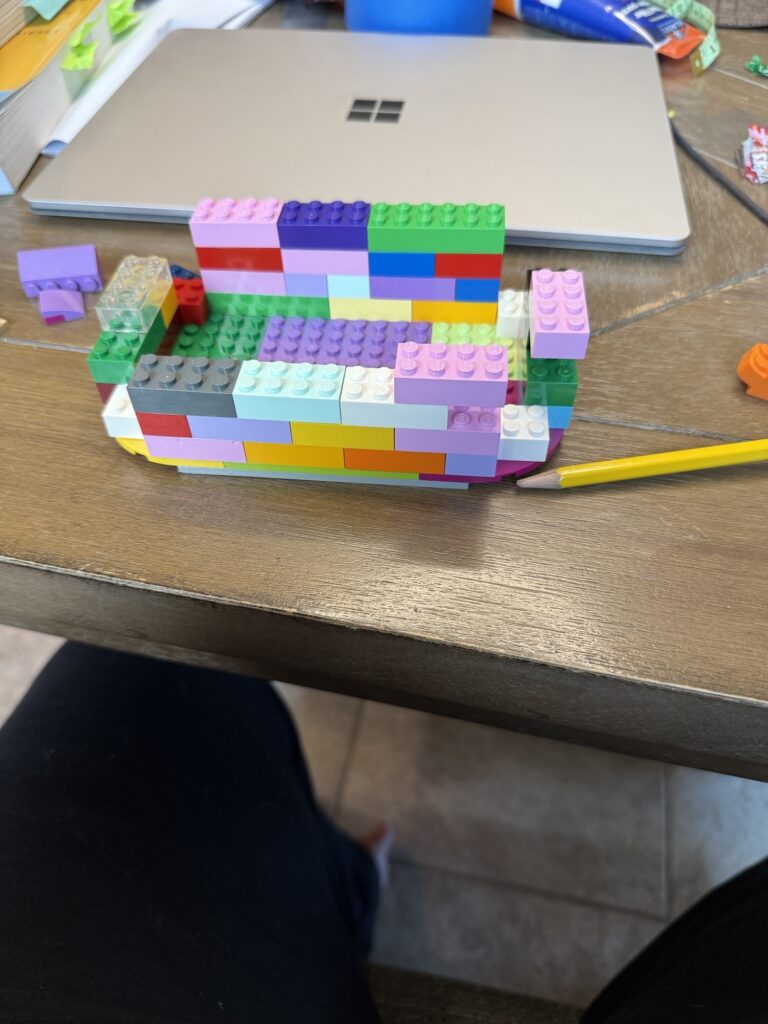
I didn’t go into this task with a pre-determined plan or template. I just started to find pieces and the box started to come together. My only idea was to keep it colourful and to keep my design simple. As I found pieces of varying size and colour I would add them to my design until I felt that I had the right size and shape of box to hold the coloured tokens. The finished box was not big enough to hold all the tokens, so back to the drawing board. I redesigned my Lego box making it bigger and able to hold all the tokens.
Step 9:
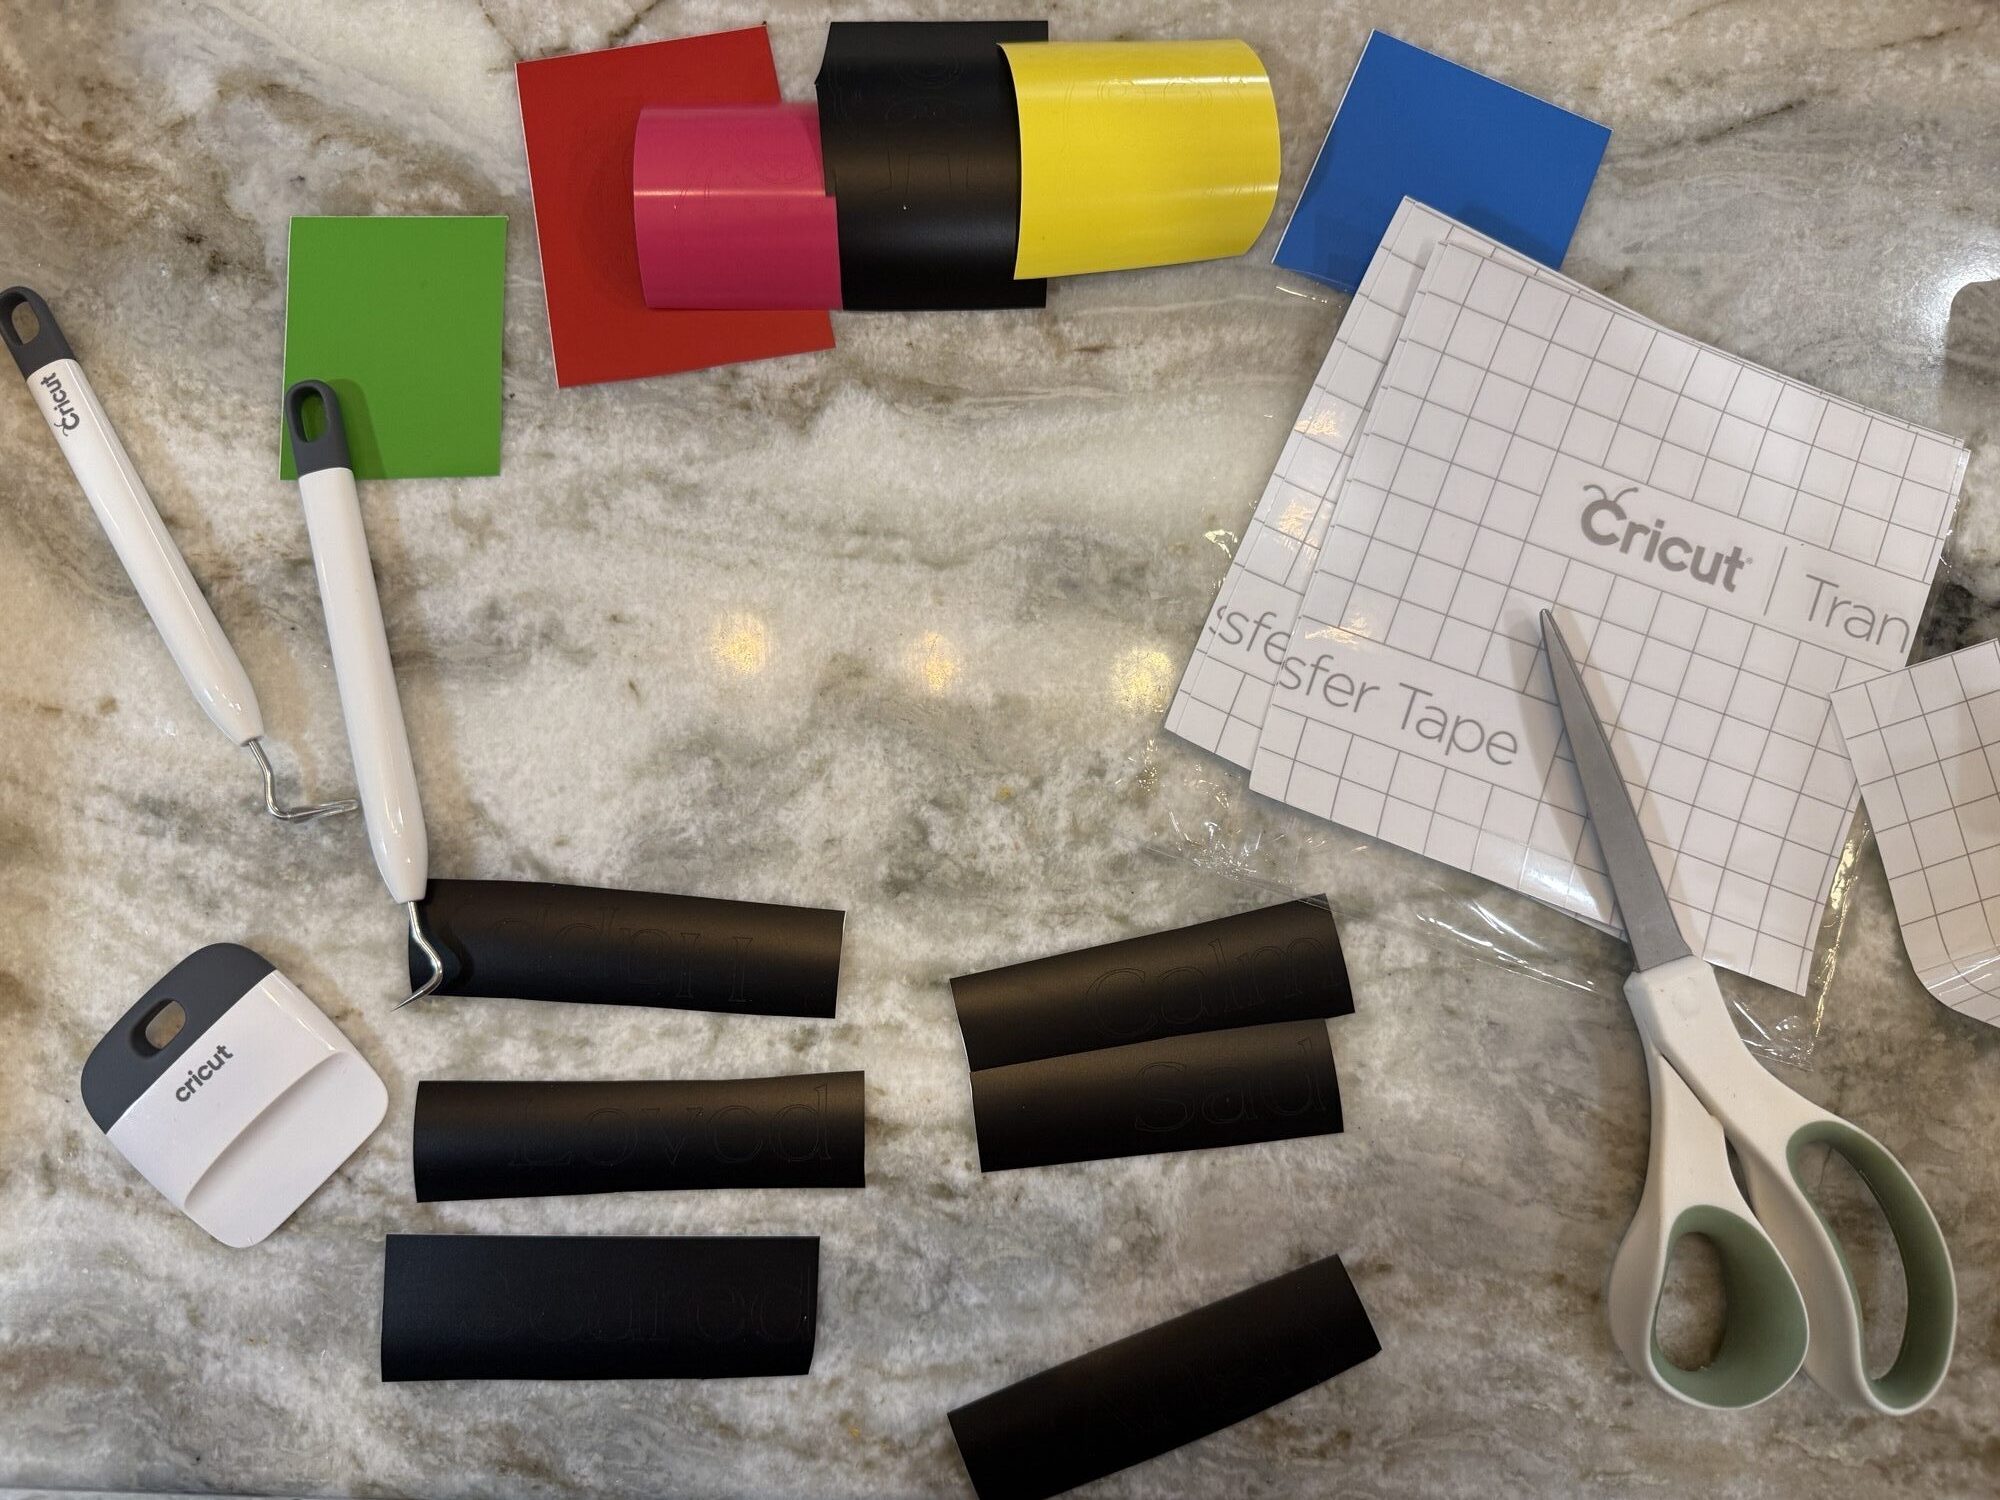
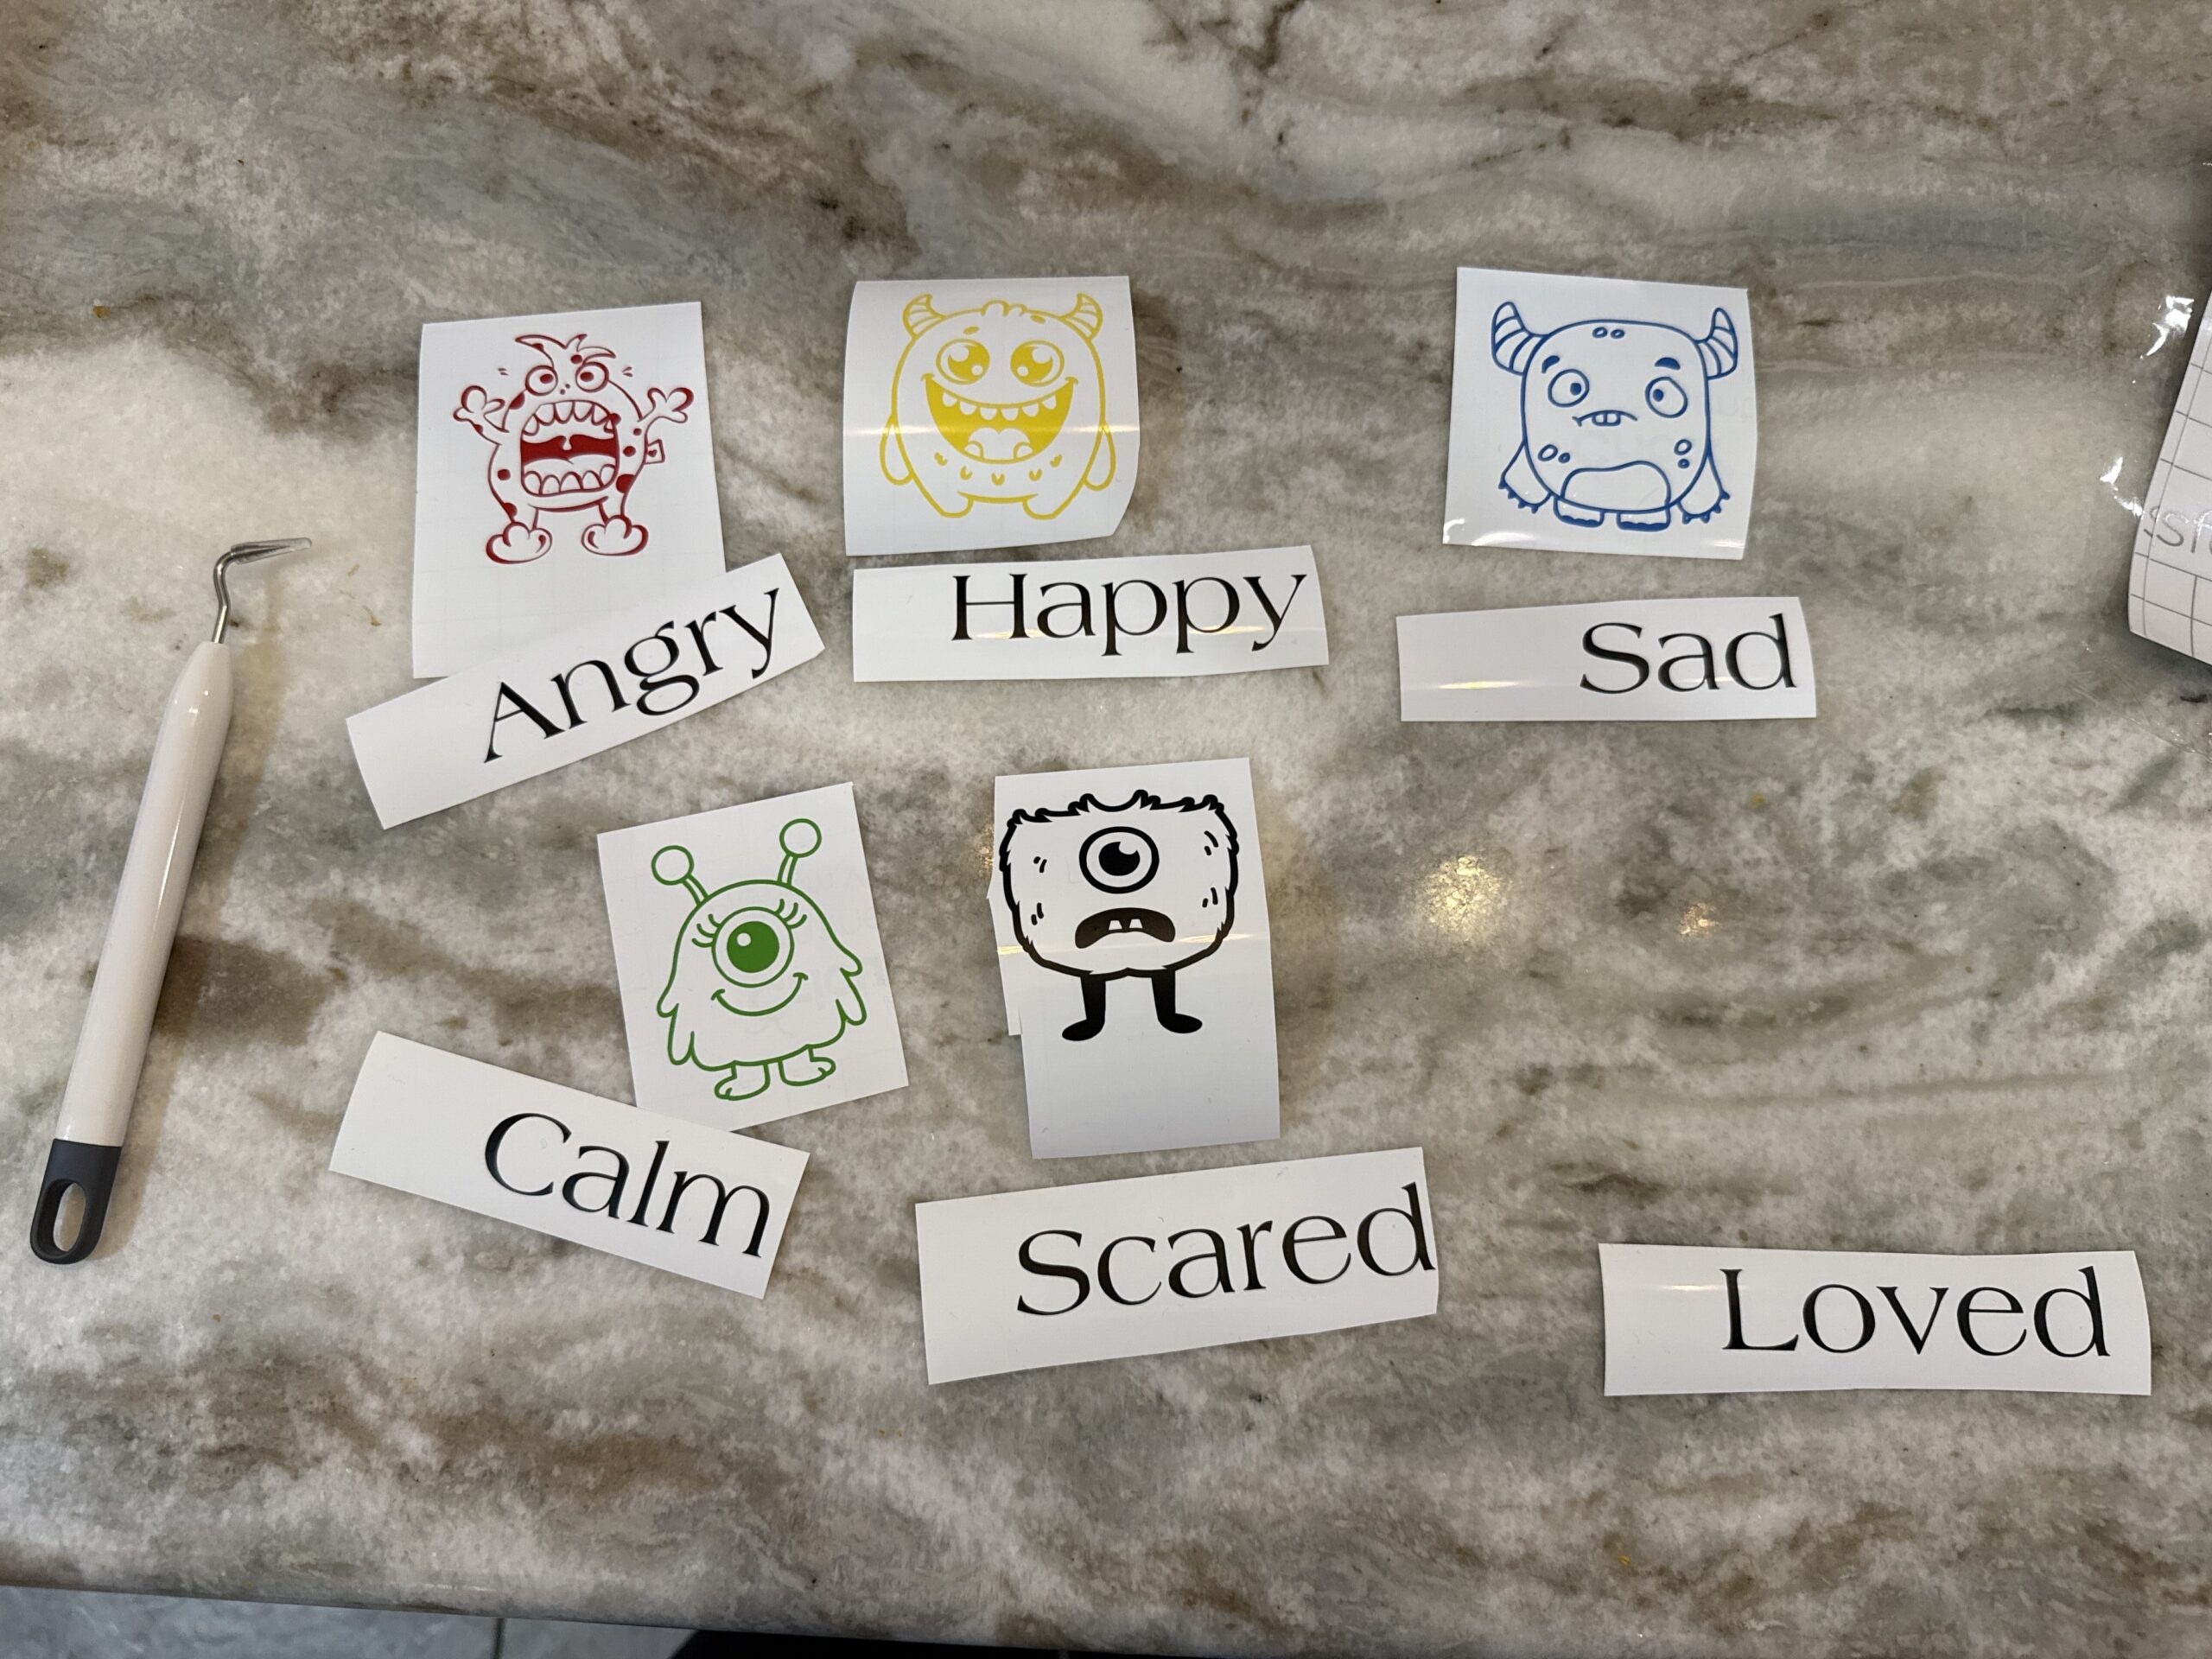
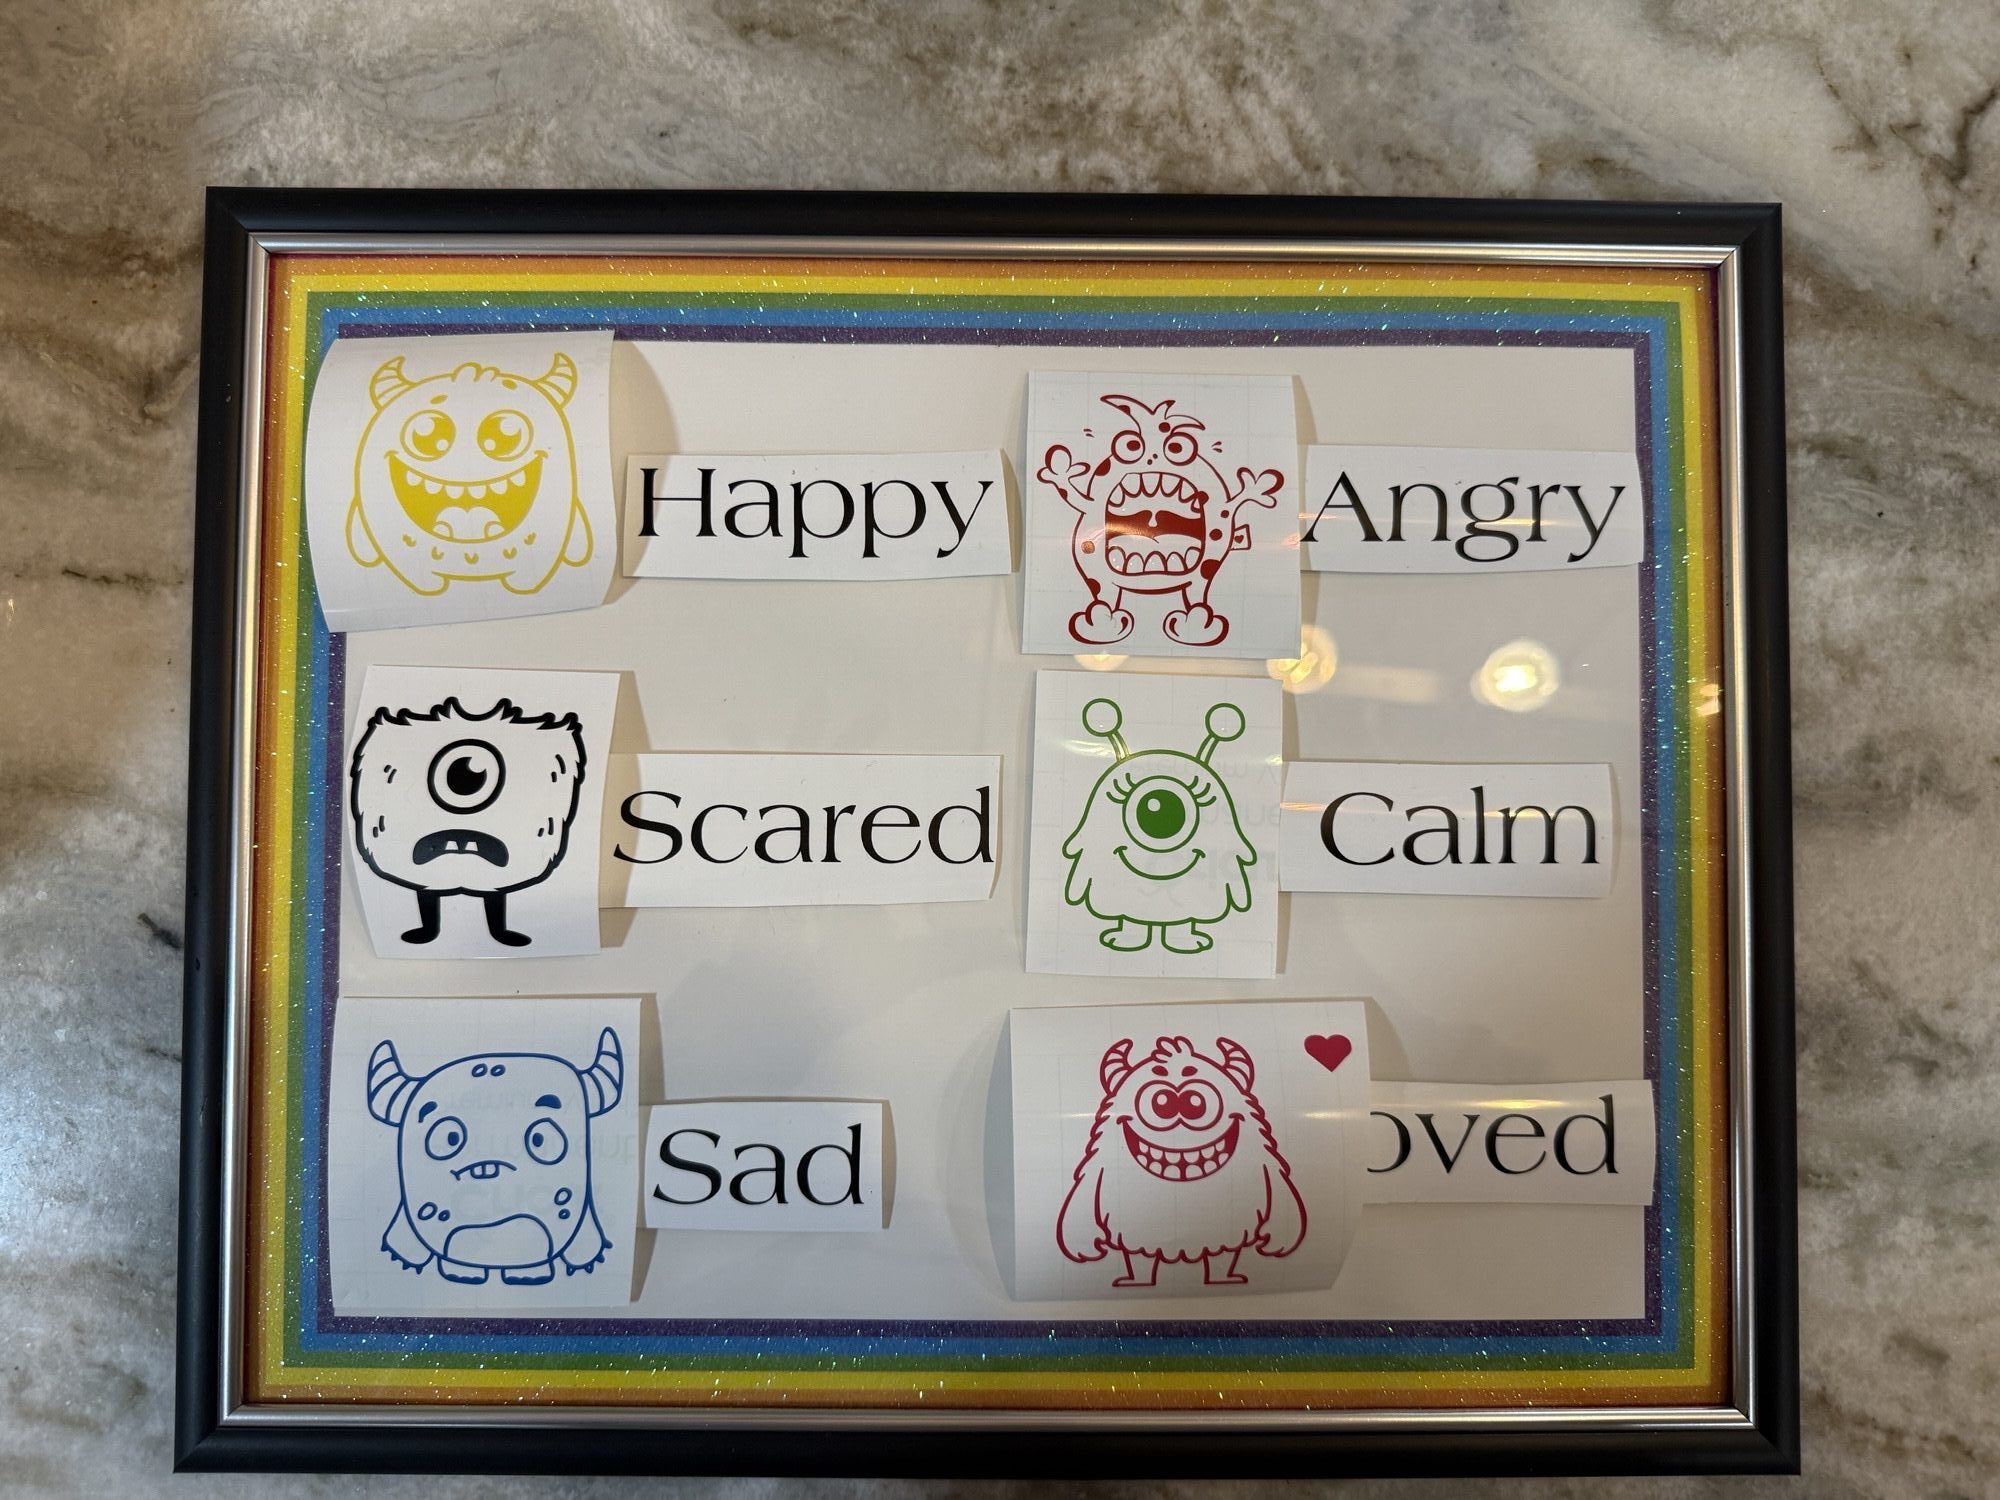
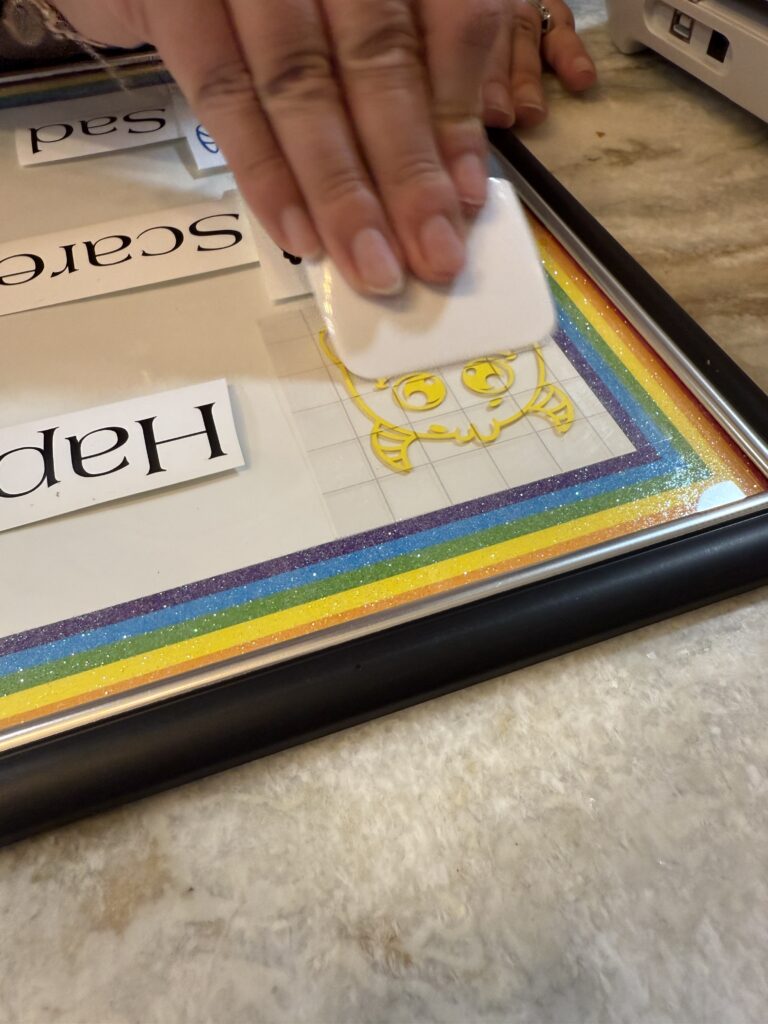
Okay, so now my project included the book, the box, the tokens and the token box. It was all really starting to come together. It felt as though it was missing something. I wanted to create a colourful poster for students to remember the colours for their emotions. I decided here would be a good place to use my Cricut. I started by designing my poster in the Cricut Design Space. I decided that my poster would include 6 different coloured monsters and a small word/phrase beside them to help students decided how they were feeling. I used design space to find monsters and then coloured to ensure that I could cut them out in the correct colours.
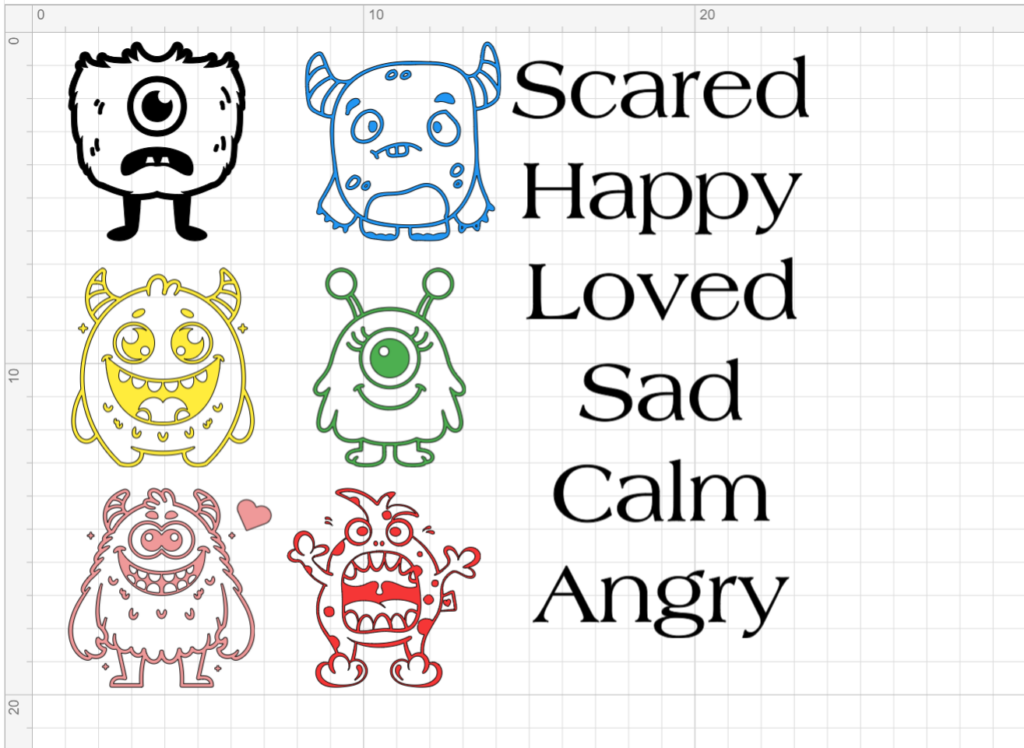
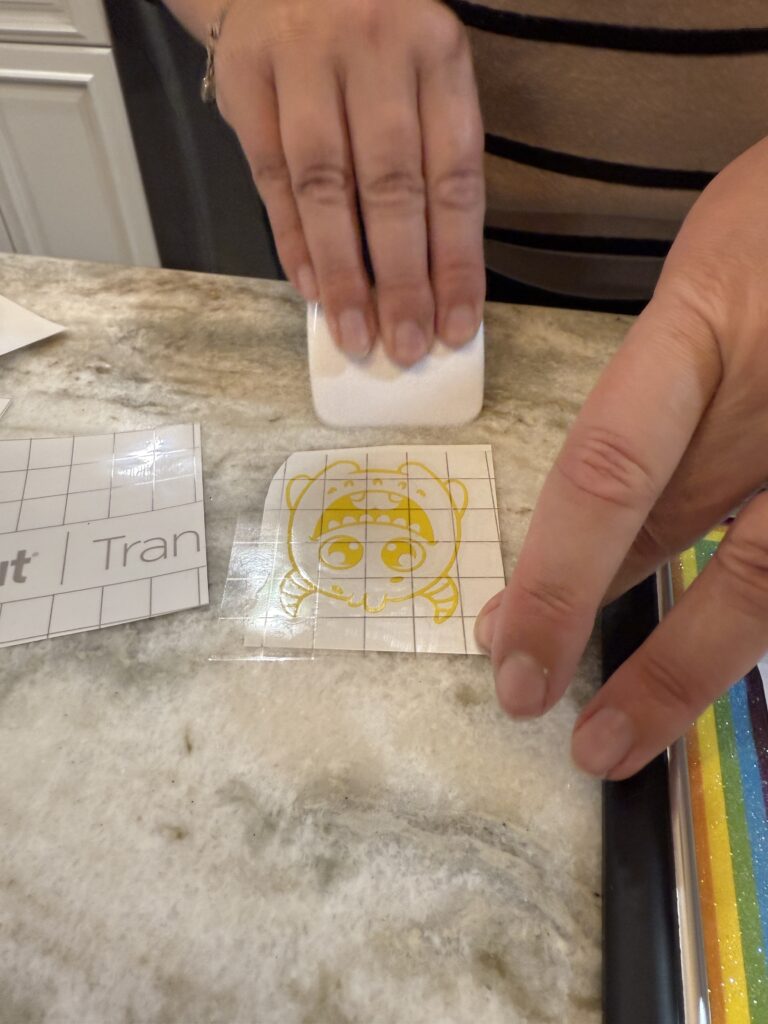
Once I had all of the words and monsters cut out, it was time to start ‘weeding’. This is where you use a sharp tool to pull extra vinyl from your design. This process can be hard on the eyes, back and patience. Once all the items were ‘weeded’, I organized them on my poster to see how they would look. I found a photo frame at the dollar store that was the same size as my poster board, so I decided to stick my vinyl stickers to the glass and use the poster board as a background for my frame. Once I liked how the stickers looked, I started using transfer tape to transfer my stickers from the vinyl backing to the glass of the photo frame.
Step 10:
It was finally time to put it all together. I am excited to introduce my project to my practicum class. I discussed with my mentor teacher and she really liked to idea.

Presenting to Class
This project is aimed towards Primary students. I plan to introduce my project to the class by reading The Color Monster by Anna Llenas. As I read the story, I will pause to discuss with students what each feeling might look and feel like. I will take time to explain that our emotions can sometimes feel confusing, and that it is always valid to experience any feeling we may have. After reading together, I will introduce Mrs. Teindl’s Colour Monster Feelings Box and the coloured tokens. I will explain that each of us is an important part of our classroom community, and that together we create a safe and caring space for everyone.
Each morning, as students enter the classroom, they will have the opportunity to select a coloured token that represents how they are feeling and drop it into the box. I will emphasize that there are no right or wrong emotions, all feelings are welcome and valid. My hope is that this daily practice will help students learn to identify, understand, and regulate their emotions while also allowing me to monitor the overall well-being of the class in a respectful and non-intrusive way.
We will also have a short discussion about trust and confidentiality so students understand that their choices are private unless they choose to share them. I will make it clear that I am always available to listen and support them if they wish to talk about how they are feeling. As students become more familiar with the activity and more comfortable expressing their emotions, my goal is for them to develop a deeper sense of belonging and safety within the classroom.
For some students, simply choosing and placing a coloured token, no matter which colour they select, may be enough of a release to help them feel better and move forward with their day. For others who may be feeling blue (sad), red (angry), or black (scared), I will encourage them to come speak with me, or another trusted adult in the school, if they would like help understanding or managing those feelings. Over time, I hope this practice will not only support emotional regulation but also strengthen the relationships and trust that make our classroom a true community. If things go well, I may extend this check-in from just a morning routine to post recess and lunch activity to allow multiple check-ins throughout the day.
Reflection and Class Reading Connections
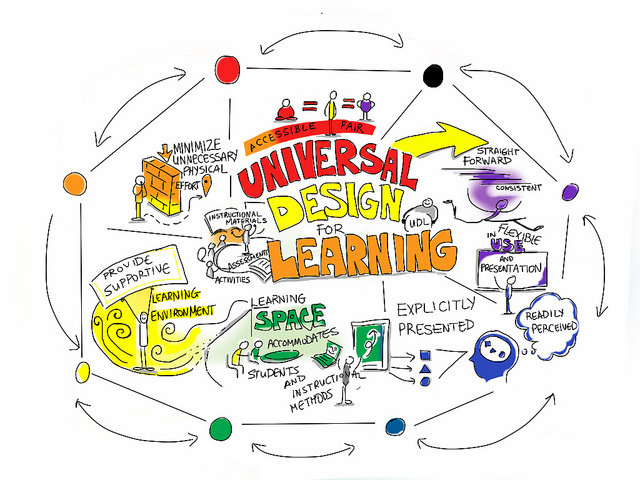
Image taken from UBC Blog Universal Design For Learning – Designing Learning
This project, Mrs. Teindl’s Colour Monster Feelings Box, highlights the principles of Equity, Diversity, Inclusion, Decolonization, and Anti-racism (EDIDA) by creating an accessible, inclusive, and emotionally responsive classroom environment. Once implemented into the classroom, every student will be provided, regardless of language proficiency, neurodiversity, or cultural background, an equitable opportunity to express their emotions using colour-based, nonverbal tools. This approach aligns with research from the article, Scaffolding frameworks by JooYoung Seo, emphasizing inclusive design in educational spaces that “support all abilities” in collaborative learning environments (Seo, 2021). Throughout the design and development of this project, I aimed to foster an inclusive environment that supports the unique emotional needs and experiences of all students, while cultivating a classroom culture that values and amplifies every voice. Through daily check-ins, students will learn that their feelings are valid and important to community well-being. This mirrors findings from Who Is Welcome Here? A Culturally Responsive Content Analysis by Hannah Keys which highlights how culturally responsive practices affirm identity and belonging in learning spaces (Keys, 2020).
Diving deeper into the EDIDA framework, as noted by Angela Reynolds in the poster at the beginning of my blog, the purpose of the framework is to provide awareness and reduce inequalities in education (Reynolds, n.d.). Looking forward at my project, I am proud of how it embodies many of the principles of Equality, Diversity, Inclusion, Decolonization, and Anti-Racism.
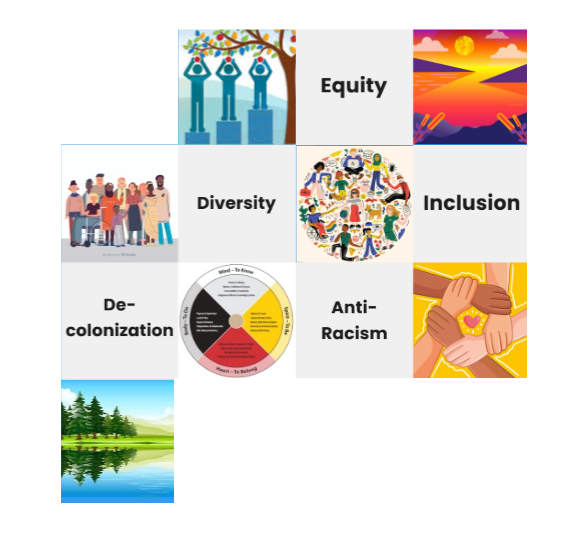
For me this initiative is deeply grounded in equity as it offers every student an accessible, judgment-free way to express their emotions, regardless of language ability, cultural background, or level of social comfort. By using colours instead of words, all students, including English Language Learners, neurodiverse students, and those with communication challenges, are able to participate equitably. Inclusion is promoted by recognizing that each student’s emotional experience is valid and by embedding practices that support their identities and lived experiences. The classroom becomes a shared community space where differences are respected and valued. Through daily emotional check-ins, students learn that they matter, that their voices are heard, and that their feelings have a rightful place in the learning environment. Aspects of anti-racism and decolonization are also briefly highlighted by creating a learning environment that acknowledges diverse and emotional perspectives, as well as prioritizes relationships over control or conformity. Students aren’t expected to conform to standardized or colonial ways of thinking with their expectations of emotions but instead encouraged to celebrate their individuality.
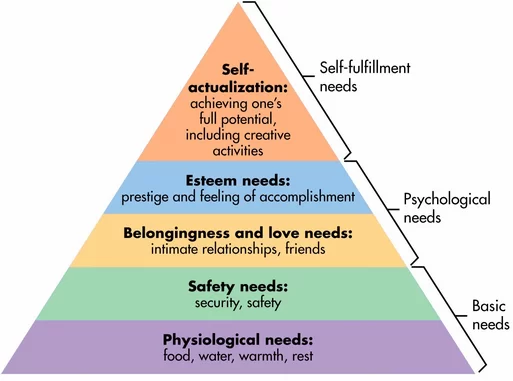
Relationships have always been at the forefront of my teaching practices. My time as and Education Assistant (EA) has shown me that the academic aspects of a learner’s day, can’t occur without their basic needs being taken care of first. This stems back to Maslow’s hierarchy of needs. Students need to have their basic needs; food, water, shelter, sleep, security and safety, before we can expect them to learn. By creating a safe environment, where students feel valued, welcomed, supported and respected, students will feel a sense of well-being. My background as an EA has given me a strong foundation in my ability to support students, as well as relationship-building techniques. Transitioning to a classroom teacher will allow me to design the classroom experience from the ground up. Rita Pierson once said “Every child deserves a champion, an adult who will never give up on them” (Ted Talk, 2013). My goal as an educator is to be that champion; for every learner, every day. My colour monster box is more than a simple classroom exercise. It is a daily practice of empathy, equity, and self-discovery. As educators, we need to foster students’ emotional intelligence and sense of belonging. In addition, my project aligns with inclusive pedagogies and several indigenous principles of learning.
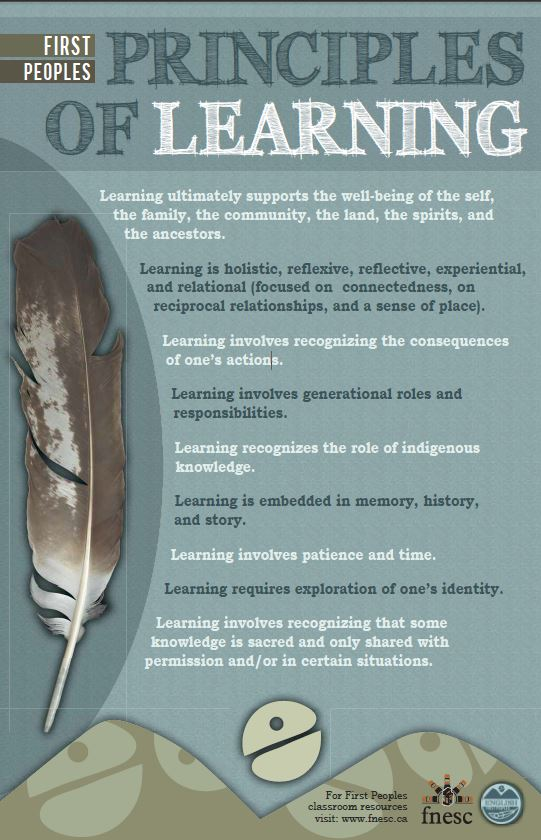
Indigenous Principles of Learning linked to my project
Learning is holistic, reflexive, reflective, experiential, and relational.
The Colour Monster activity engages students in hands-on, emotional, and relational learning. It combines thinking (head), feeling (heart), and doing (hands) into one cohesive experience.
Learning involves recognizing the consequences of one’s actions.
By regularly reflecting on their emotions and the impacts their emotions may have on others, students develop a deeper understanding of how feelings shape interactions and relationships within the classroom community.
Learning requires exploration of one’s identity.
The project supports students in exploring who they are, how they feel, and how they can safely express those emotions. This fosters self-awareness and emotional identity. These are key aspects of personal and cultural growth.
Learning is embedded in memory, history, and story.
By engaging with The Colour Monster, students explore their emotions and create a toolkit to help them manage their feelings in the future.
Learning ultimately supports the well-being of the self, the family, the community, the land, the spirits, and the ancestors.
By nurturing emotional wellness and empathy, this project contributes to the holistic well-being of each student and the classroom community as a whole.
References
Bixby School. (2016, September 14). maslow-pyramid – Bixby Private Preschool & Elementary School, Boulder CO. Bixby Private Preschool & Elementary School, Boulder CO. https://www.bixbyschool.org/time-for-a-snack/maslow-pyramid/
Colour Monsters | Teaching resources. (n.d.). [Images] https://www.tes.com/teaching-resource/colour-monsters-12887052
First peoples principles of learning. (n.d.). https://www.fnesc.ca/first-peoples-principles-of-learning/
Kapoho. (2017, January 30). Universal Design for Learning – Designing Learning. https://blogs.ubc.ca/learningdesign/2017/01/30/universal-design-for-learning/
Kye, H. (2020). Who Is Welcome Here? A Culturally Responsive Content Analysis of Makerspace Websites. Journal of Pre-College Engineering Education Research, 10(2), 1. https://doi.org/10.7771/2157-9288.1190
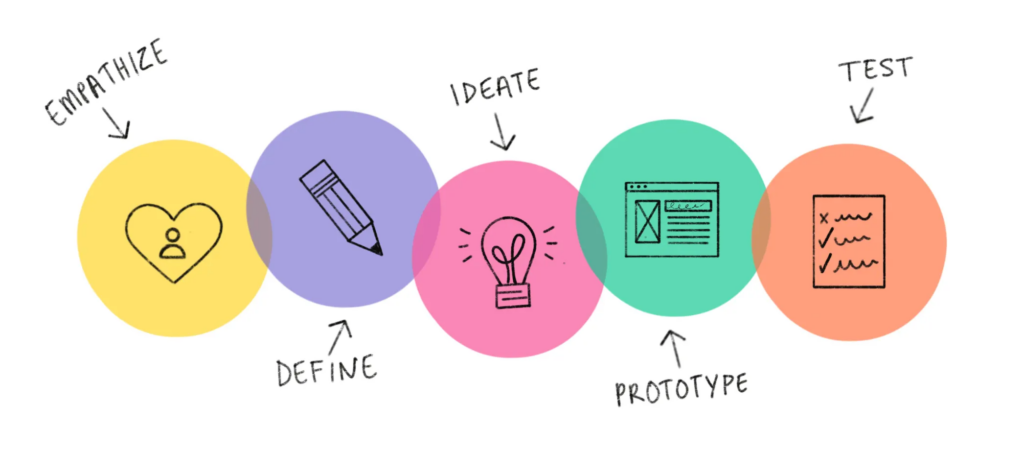
Lieberman, R. (2020, January 18). How to use design thinking in the UX design process. Medium. https://medium.com/swlh/how-to-use-design-thinking-in-the-ux-design-process-e33c4f11a6be
Llenas, Anna. (2012). The Color Monster: a story about emotions. Little, Brown and Company: New York.
Losito, C. (2023). The EDIDA Framework. [Image]. EDIDA Framework by Carina Losito on Prezi
Reynolds, A. (n.d.). EDIDA Framework. Retrieved October 29, 2025, from https://angelaireynolds.wordpress.com/ableism-equity/.
Read Along Audiobooks. (2025, February 21). THE COLOR MONSTER: A Story About Emotions | Fun read aloud book [Video]. YouTube. https://www.youtube.com/watch?v=XSiS6Lcdcl8
Seo, J., & Richard, G. T. (2021). SCAFFOLDing all abilities into makerspaces: a design framework for universal, accessible and intersectionally inclusive making and learning. Information and Learning Science, 122(11/12), 795–815. https://doi.org/10.1108/ILS-10-2020 0230
Ted Talk. (2013, May 3). Every kid needs a champion | Rita Pierson | TED [Video]. YouTube. https://www.youtube.com/watch?v=SFnMTHhKdkw